不积跬步,无以至千里;不积小流,无以成江海;
前段时间做了一个新加坡的电商项目,要求添加Google和Facebook的第三方登陆支持,我看国内介绍不多,也不够详细,在这里介绍一下。
先说下Facebook的,我发现Facebook竟然提供了中文版的新手入门文档,所以大家也不用觉得难啃了,我在这里就简单说一下流程与我遇到的问题,大家参考上面的文档就好了(不要跟我讲翻不了墙,翻不了墙你还是不要集成了,集成了也登陆不上啊。。。)。
- 下载 SDK
- 创建 Facebook 应用
- 应用程序设置
- 添加 SDK
- 配置 Xcode
- 连接应用程序委托
- 添加应用事件
首先,在下载的SDK中是有一个示例工程的,所以大家如果遇到了什么解决不了的问题,可以去参考里面的示例工程。
仔细想想facebook好像没有遇到什么问题,大家按照上面来吧。如果遇到问题,可以在下面留言。如果大家只是需要集成登陆功能,只需要添加FBSDKCoreKit.framework和FBSDKLoginKit.framework即可。
Google没有提供中文文档,我这里详细说一下流程。
下载SDK
首先去下载Googel的最新版SDK。下载完毕了,本页面不要关闭,一会儿还有用。下载的SDK中也是包含有可以直接运行的示例工程的,大家多做参考。
添加SDK
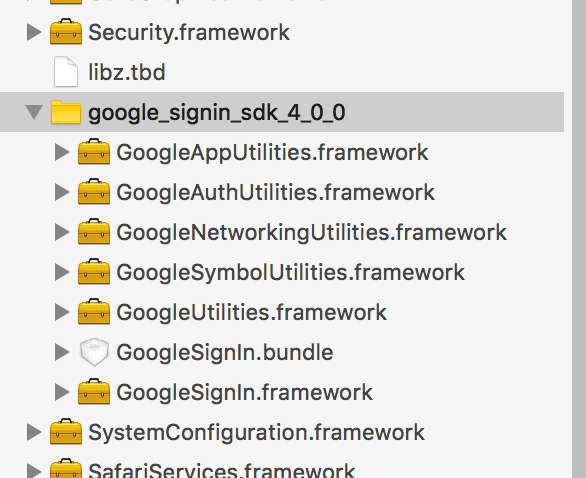
将SDK解压,加入到你的工程中,如下图:
配置Xcode
1.添加下面这些frameworks
- AddressBook.framework
- SafariServices.framework
- SystemConfiguration.framework
- libz.tbd
我只能说Google有点坑,libz.tbd在文档中没有提到。。。害得浪费我半天时间。所以还是使用pods好啊,可以自动帮你配置所需的依赖,但是我在使用pods的时候却无法下载Google的sdk,而且我确定我翻墙成功了,如果有朋友知道为什么,还请不吝赐教.
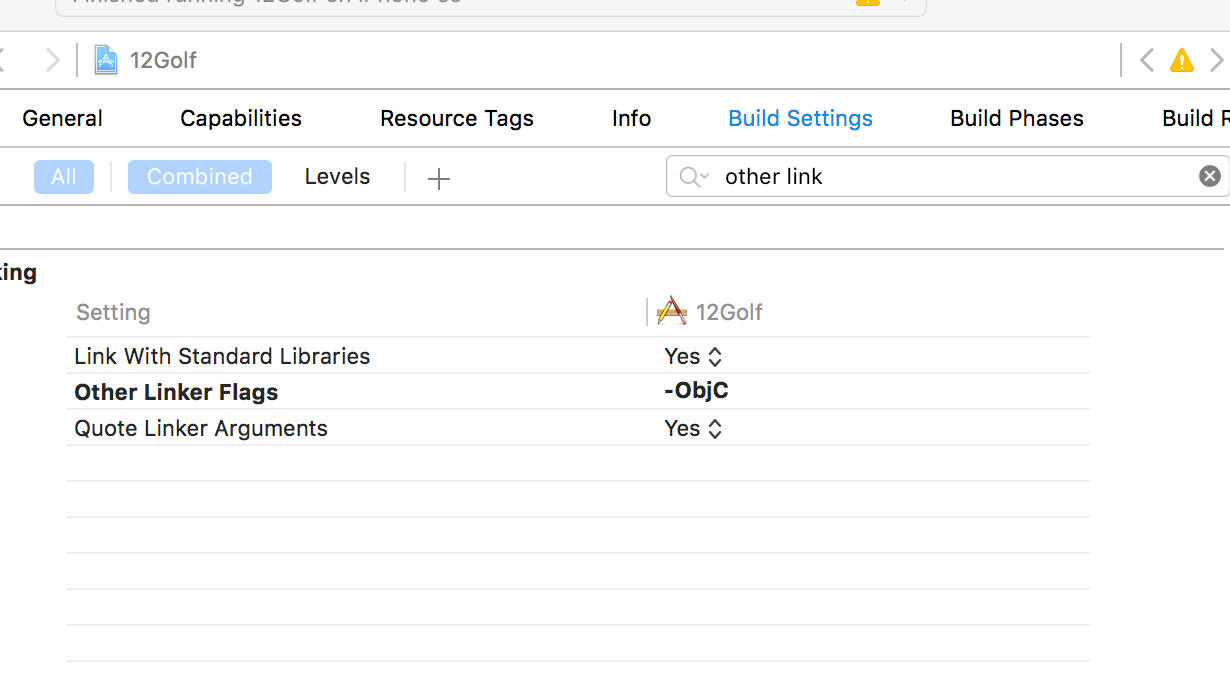
2.添加Objc linker flag到build setting
- Other Linker Flags: $(OTHER_LDFLAGS) -ObjC
3.注册你的app到管理中心
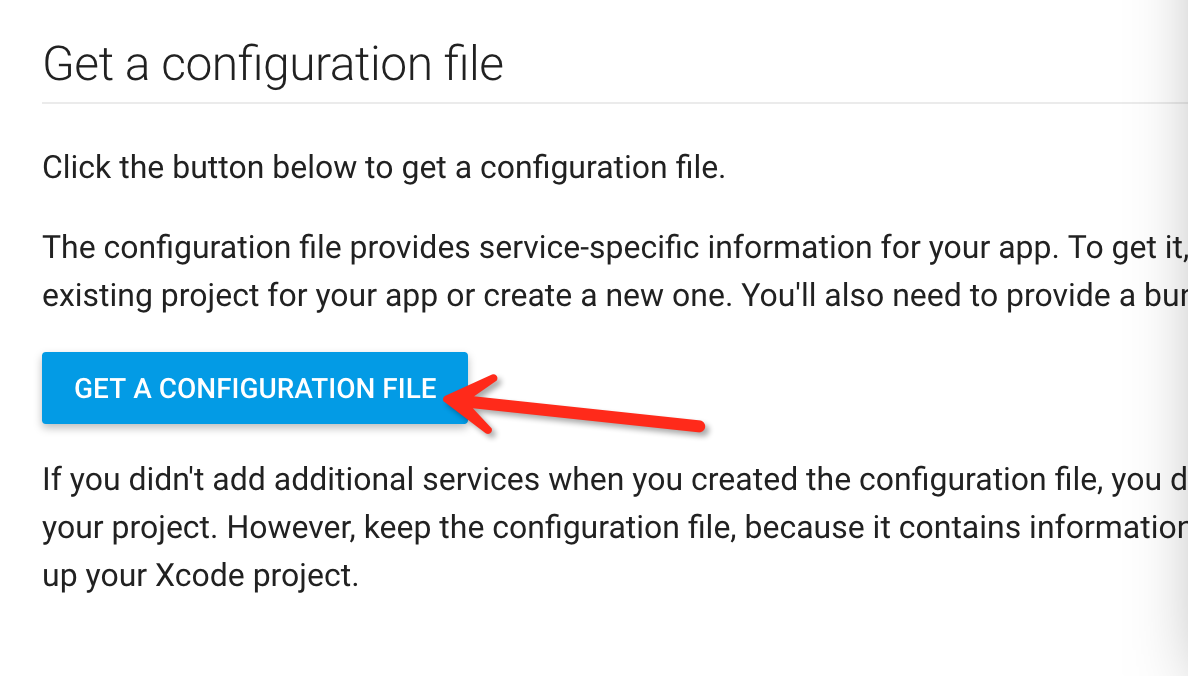
4.下载你的app的配置文件
在刚刚下载sdk的页面往下,可以获得你的app的配置文件
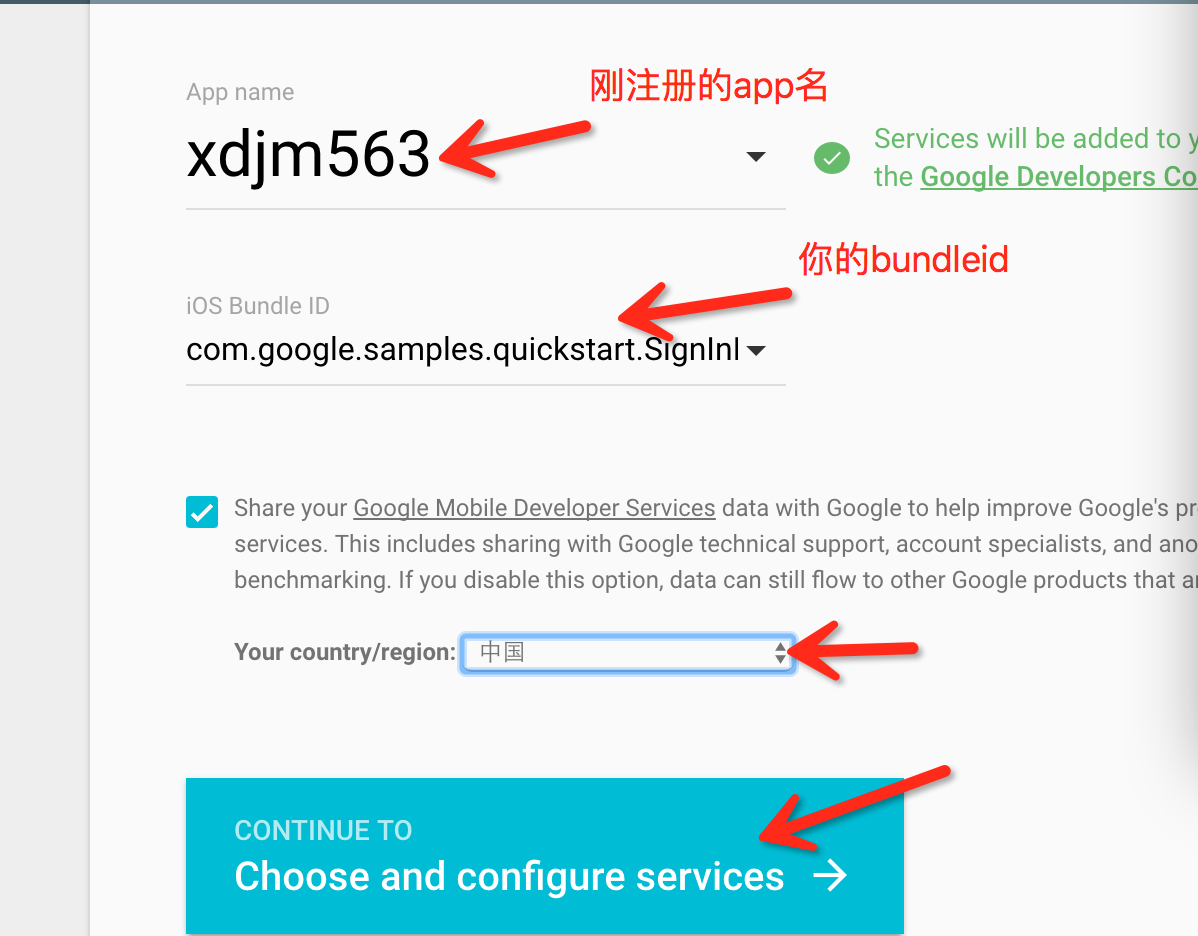
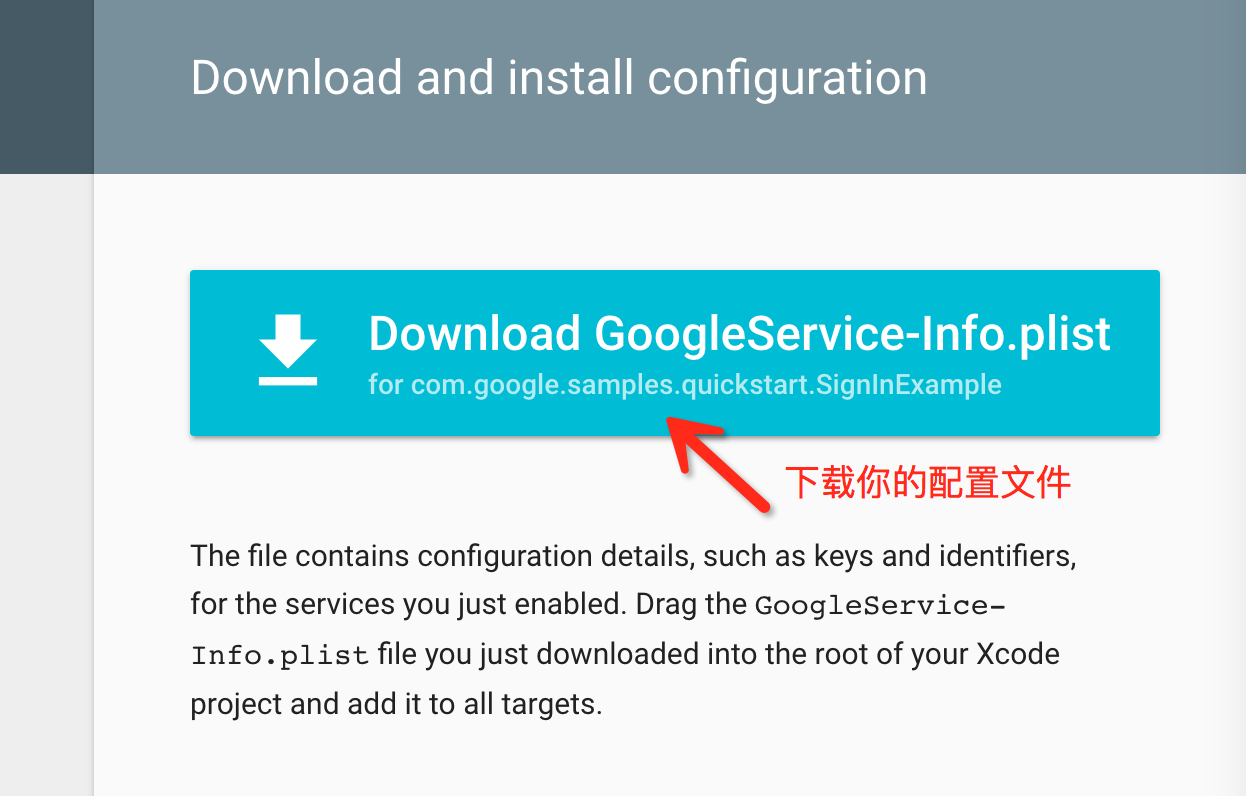
那么这个config文件到底是什么的,其实它记录的是你的app的相关信息,其中最重要的是你的app的client_id和reserveclient_id.
5.添加URL scheme到你的项目
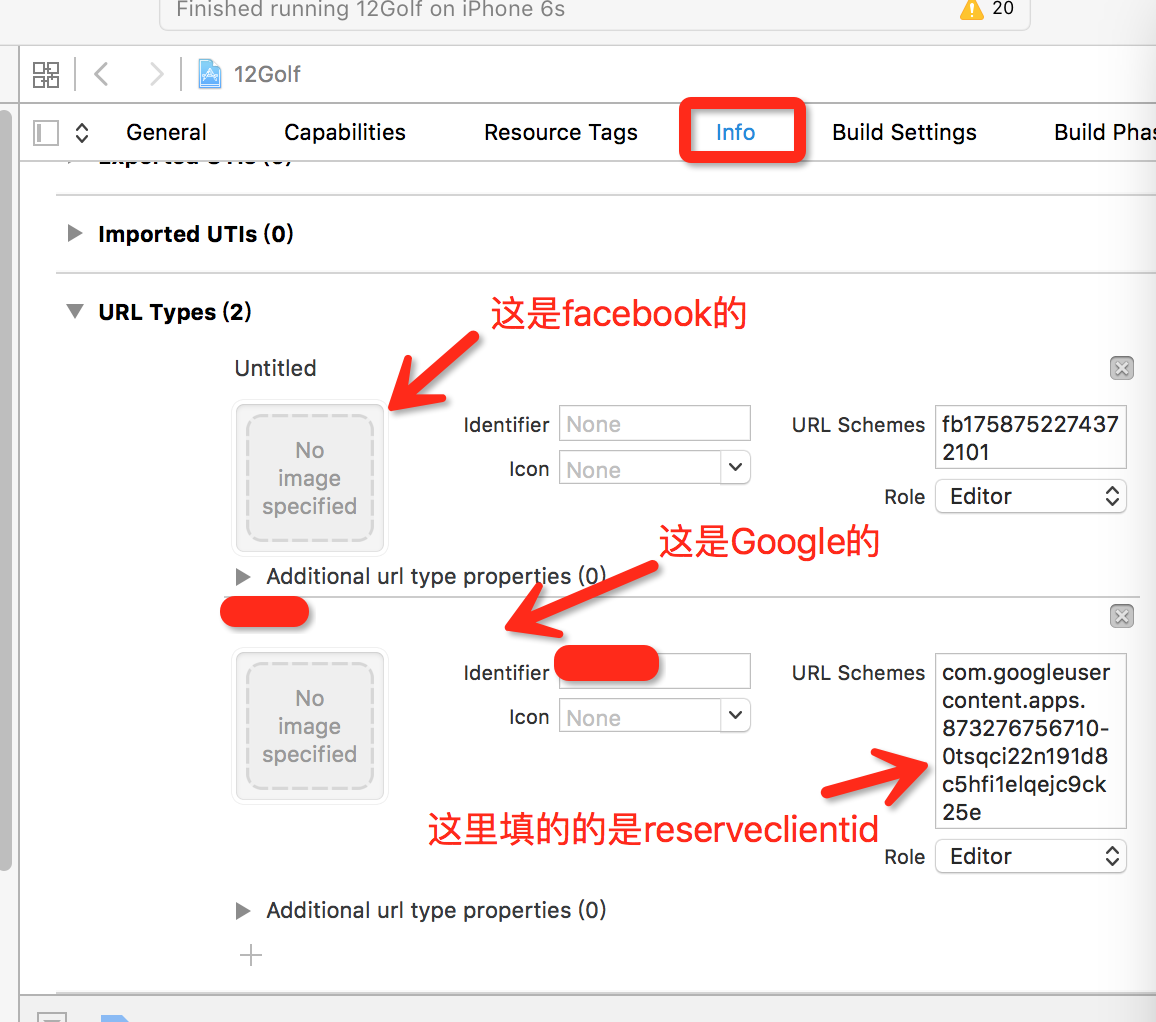
好了,至此就算是配置完毕了,接下来可以写代码来调用Google的登陆了。
Google登陆的使用
1.在appdelegate.m中导入#import <GoogleSignIn/GoogleSignIn.h>
2.设置GGLContext
- (BOOL)application:(UIApplication *)application
didFinishLaunchingWithOptions:(NSDictionary *)launchOptions {
NSError* configureError;
[[GGLContext sharedInstance] configureWithError: &configureError];
NSAssert(!configureError, @"Error configuring Google services: %@", configureError);

[GIDSignIn sharedInstance].delegate = self;

return YES;
}
3.实现回调
- (BOOL)application:(UIApplication *)app
openURL:(NSURL *)url
options:(NSDictionary *)options {
    return [[GIDSignIn sharedInstance] handleURL:url
    sourceApplication:options[UIApplicationOpenURLOptionsSourceApplicationKey]
    annotation:options[UIApplicationOpenURLOptionsAnnotationKey]];
}

//如果你是使用的iOS8或者更老的版本,使用下面的
//这里比较郁闷的是facebook只是提供了老版本的接口。。。没有提供上面的代理实现
//所以我最后都是用的下面的这个 索性没有出问题
- (BOOL)application:(UIApplication *)application
openURL:(NSURL *)url
sourceApplication:(NSString *)sourceApplication
annotation:(id)annotation {
return [[GIDSignIn sharedInstance] handleURL:url
sourceApplication:sourceApplication
annotation:annotation];
}
好的,那么问题来了,当你同时使用Google和Facebook时,如何判断是谁的回调呢?看解决方式
- (BOOL)application:(UIApplication *)application
openURL:(NSURL *)url
sourceApplication:(NSString *)sourceApplication
annotation:(id)annotation {
    if ([url.absoluteString rangeOfString:kGoogleReversedClientID].location != NSNotFound) {
        //Google的回调
        return [[GIDSignIn sharedInstance] handleURL:url
        sourceApplication:sourceApplication
        annotation:annotation];
    }else{//facebook的回调
        return [[FBSDKApplicationDelegate sharedInstance] application:application
        openURL:url
        sourceApplication:sourceApplication
        annotation:annotation
        ];

    }
}
sharesdk是不是也是用的这种方式呢?难道被我猜到了?嘿嘿。
4.好了,现在到你的登陆界面,正式使用登陆按钮
//实现代理
@interface ViewController : UIViewController <GIDSignInUIDelegate>

//在didload方法中设置代理
- (void)viewDidLoad {
[super viewDidLoad];

// TODO(developer) Configure the sign-in button look/feel

[GIDSignIn sharedInstance].uiDelegate = self;

// 不推荐使用自动登陆
/**
When users silently sign in, the Sign-In SDK automatically acquires access tokens and automatically refreshes them when necessary. If you need the access token and want the SDK to automatically handle refreshing it, you can use the getAccessTokenWithHandler: method. To explicitly refresh the access token, call the refreshAccessTokenWithHandler: method.
*/
//上面这段话是官网上的,大概是说如果你使用了自动登陆,你可以通过getAccessTokenWithHandler:
//这个函数获取access token并且让SDK自动更新access token,如果你想要立刻更新,你可以使用
//refreshAccessTokenWithHandler:
//[[GIDSignIn sharedInstance] signInSilently];
}
5.实现代理方法
//这些我就不再解释了  很好理解
// Stop the UIActivityIndicatorView animation that was started when the user
// pressed the Sign In button
- (void)signInWillDispatch:(GIDSignIn *)signIn error:(NSError *)error {
    [myActivityIndicator stopAnimating];
}

// Present a view that prompts the user to sign in with Google
- (void)signIn:(GIDSignIn *)signIn
    presentViewController:(UIViewController *)viewController {
    [self presentViewController:viewController animated:YES completion:nil];
}

// Dismiss the "Sign in with Google" view
- (void)signIn:(GIDSignIn *)signIn
    dismissViewController:(UIViewController *)viewController {
    [self dismissViewControllerAnimated:YES completion:nil];
}
6.自定义button
Google提供的button叫做GIDSignInButton,好吧,扯淡,把我也欺骗了,这货的父类是UIControl,当时知道真相的我眼泪掉下来(我在storyboard里翻了半天啊==)。那么所谓的自定义就是设置这货的属性了。
//好吧 只有这俩属性 具体使用方式你们可以参考示例项目
// The layout style for the sign-in button.
// Possible values:
// - kGIDSignInButtonStyleStandard: 230 x 48 (default)
// - kGIDSignInButtonStyleWide:     312 x 48
// - kGIDSignInButtonStyleIconOnly: 48 x 48 (no text, fixed size)
@property(nonatomic, assign) GIDSignInButtonStyle style;

// The color scheme for the sign-in button.
// Possible values:
// - kGIDSignInButtonColorSchemeDark
// - kGIDSignInButtonColorSchemeLight (default)
@property(nonatomic, assign) GIDSignInButtonColorScheme colorScheme;
当然,我是一直坚信没有无法自定义的view的,请移步iOS一些小技巧及小知识点总结。
PS:后来我发现Google的登录按钮其实可以使用自己的按钮,你只需要在按钮事件中添加[[GIDSignIn sharedInstance] signIn]即可,当然,其他的代理仍然是需要实现的。
文档信息
- 本文作者:Yawei Wang
- 本文链接:https://pfcstyle.github.io/2016/06/11/iOS-Project-Sumary3/
- 版权声明:自由转载-非商用-非衍生-保持署名(创意共享3.0许可证)